Impromptu Tag!
Hello…..
I had a fabulous day yesterday. I had an impromptu day off work (hence the name of my tag) and indulged myself playing all day long in my craft room and this is the tag I made.
It was inspired by one of Tim’s tags from either his 2013 or 2014 Tag Challenge (sorry I can’t remember which), but as usual I didn’t have most of the necessary ingredients to make it a complete copy… no scattered straw embossing powder to make any ‘wet sand’ for one thing, no starfish die cuts for another…but I did have enough in my stash to improvise.
For my background I used a mixed combo of Distressed Stains & Ink with water splatters and a little random second stamping with the ledger and compass stamps from a SU stamp set called The Open Sea. Over the top went a spritz of Perfect Pearls Mist for a slight glimmer.
I used an Inkydelicious stamp set called Water Droplets which I stamped with French Ultramarine Archival ink to add bubbles down the LHS of the tag. A little water ‘bleached’ out the centre of each bubble to lighten them followed by some highlighting to the top using a white Uni-ball Signo pen. Glossy Accents went over the top for more depth and a bit of gloss.
 My seaweed was Ranger’s Festive Foliage cut from some aqua green coloured card-stock from my stash. I coloured it with Stormy Sky Distress Ink and Perfect Pearls Mist.
 I also cut out three branches from another die set called Branching Out in a textured brown coloured card-stock and gave this the same treatment colouring it with silk green & sapphire silk Colourbox cat’s eyes pigment inks.
I’m always a little hesitant to use these inks as they never seems to dry, even thought I use my heat gun …. maybe I’m too impatient ! Anyway I decided to persevere today and this time, after drying the ink with my heat gun I sprayed over the top with a fixative and then added Glossy Accents…. that certainly did the trick!
 I also added some random dots of Distressed Ink through a stencil to my background…. just because I could (Smile)
I had some white muslin in my embroidery stash that I wanted to use on my tag as fish netting. So I snipped off a small piece, threaded the edges and pulled out a few random fibres to distress it. I then coloured it with a mix of Distress Stain and added a hint of Brushed Pewter to the colour theme.
Ages ago I sketched and watercolored a seahorse and mermaid for an art journal page…..
I dug it out to remind myself of the seahorse and set about replicating it for the tag.
First I drew it free-hand on some manilla watercolour card and then used my SU watercolour pencils & crayons to colour it in various aqua shades.
After a touch of white from a Uni-ball Signo to add highlights, I gave the seahorse a generous coating of Clear Rock Candy Distress Crackle Paint (love this stuff) and set it aside to dry. Once dry, I gently dabbed Pumice Stone Distress Stain into the cracks around the edge to add shadow.
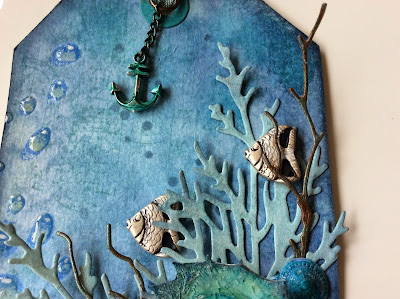
Whilst my seahorse and seaweed twigs were drying I dug out the embellishments I planned to use from my stash. Two of the little fish and a couple of starfish were metal buttons, so I snipped off the loops on the back with wire cutters and then coloured them with Green Pesto Alcohol Ink and Picket Fence Distress Paint.
I also coloured the little metal anchor and a Ranger tassel chain with the same colour Alcohol Ink.
The shells and large starfish were also button, but plastic this time, and although they were pale blue, the colour wasn’t right for the tag, so they got the same treatment with the Pesto Alcohol Ink.
I also coloured the little metal anchor and a Ranger tassel chain with the same colour Alcohol Ink.
Then it was just a case of fixing all my pieces in place on the background.
As always I backed my tag with another to keep the back neat and tidy and the final touch was adding some seam binding. I had the perfect colour in my ribbon stash so there was no need to ink & spritz this time.
As always I backed my tag with another to keep the back neat and tidy and the final touch was adding some seam binding. I had the perfect colour in my ribbon stash so there was no need to ink & spritz this time.
Here are a couple of close ups of my tag.....
I really liked how my seahorse turned out with the Crackle Paint and I know it looks more like a dragon than a seahorse but that's cool with me (I like both!)
I really liked how my seahorse turned out with the Crackle Paint and I know it looks more like a dragon than a seahorse but that's cool with me (I like both!)
Can you see, just behind my seaweed there is another little fish peeking out…… It’s made from shrink plastic and was in my stash from when I made a birthday card for a fisherman friend…. I knew it would come in useful sometime! Although the colours were right it really doesn't sit with the other embellishments, but I couldn't resist using it anyway. Makes me smile to see him peeking out....
Thanks for taking time to read my posting.... have a fabulous day crafting.
Carol. x


No comments:
Post a Comment